Injection molded plastic parts have some wonderful benefits including scalability, the ability to make simple to extremely complex parts, and uniformity, the ability to make hundreds to millions of virtually identical parts. However, the building and maintaining of injection mold tools can be expensive and making tool changes can be challenging.
Maximize the Benefits of using Injection Molded Parts
1. Uniformity is best. Constant wall thicknesses throughout your part will provide the best flow. Nominal wall thickness should be between 2-3mm. The recommended minimum is 1mm and the maximum is 4mm for conventional injection molding processes.
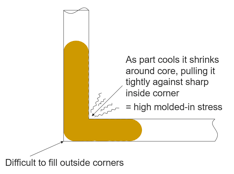
2. Smooth trumps sharp. Use radii when possible and avoid sharp transitions between wall sections.
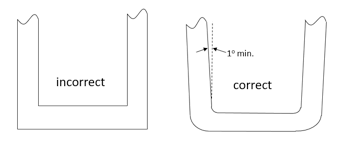
3. Draft is your “frenemy.” Adding a draft angle to the faces of your part is helpful to release it from the tool, yet it can cause design challenges especially for mating parts. Recommend minimum draft angles are one degree on untextured core and at least three degrees on textured cavity surfaces.
4. Avoid surfaces with zero draft unless necessary. If you do need a zero-draft area to ensure proper part mating and tolerances, try to minimize it to just a portion of the face, not the whole surface.
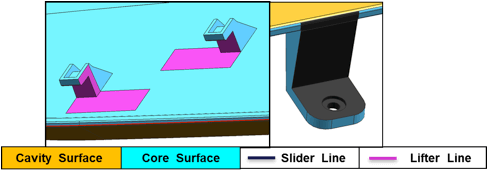
5. Simpler is better. Avoid undercuts (areas that cannot be formed via the simple open/shut direction of a tool). When simple won’t work, lifter and slides allow features to be formed that are undercuts in the main pull direction. If so, leave at least 2 to 3 times the width of the feature to allow the lifter or slide to travel.
6. Transition from thick to thin. Parts will form better if plastic flows through features moving from greater to lesser wall thickness starting from the gate(s) (where the plastic first flows in to fill the part).
7. Sink (a local surface depression on a part due to thicker sections of plastic cooling more slowly) is bad. To reduce or eliminate the visibility of blemishes on cosmetic surfaces it is important to follow some recommended guidelines:
-
- Try to avoid gates, ribs, screw bosses, etc. on the back side of important cosmetic surfaces;
- Rib heights should be 3x or less than the wall thickness;
- Rib bases should be 60% or less of the wall thickness.
8. Datums define territory. Use datums (features that are used as reference points to define each part) to establish part interfaces and interactions to the overall system. Using a datum structure that matches the design intent of the assembly can mean the difference between a product functioning well or not.
9. Interrogation is good. Take DFM (Design for Manufacturing) reports seriously since they convey the tool molder’s understanding of the design especially information like ejector pin locations (may conflict with planned design changes), gate locations (may cause cosmetic concerns) and parting line location (could affect interactions with mating parts). Use inspection reports to interrogate the design. Examples of DFM reports shown here:
10. Prototype early and often. Current prototyping methods, including 3D printing allows for early testing of design concepts where pieces of and/or the whole part can be modeled before building expensive tooling.


