When it was announced there would be a Halloween mechatronics challenge at the end of last year where the voting would entail social media- there was only one clear way to win: include either cats or babies in the video. Cats seemed less likely to put up with a mechatronic contraption, so babies it had to be. Luckily, we had two babies under the age of one whose moms were an electrical and firmware engineer. After recruiting a mechanical engineer- our crack team was ready to begin. We decided to go with an angel and devil costume as a (hopefully) sufficiently easy, but still impressive result.

The end goal was to have two pairs of wings which would flap at a speed based on the input from a sensor. Initial thoughts were to use a microphone and increase (or decrease?) the speed of flapping based on the volume of the baby’s giggling (or crying?). With babies who were not yet doing much talking this was given up on in favor of using an accelerometer to adjust flapping speed. As the babies wiggled, the wings would flap faster. This generally surprised the babies into stillness, so it worked fairly well, although the speed had to be adjusted so as to not destroy the mechanism.
Hell’s Angels Team: Kristin Pollock, Amy Cheben, Eliza MacLeod
Mechanical Engineering
The mechanical design of the flapping mechanism was driven by three main criteria. First, the mechanism had to be safe for babies and from babies, which means all the moving parts were isolated from potential grasping baby hands and all the components needed to be secured in place against potentially erratic baby movements. Second, it had to be lightweight and small since babies are small and can’t carry much weight yet. Third, the overall system needed to be relatively inexpensive; we’re trying to make some cool costumes and win some prize money here!
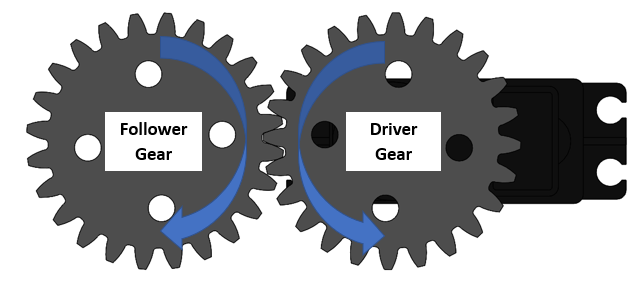
To simplify the overall system, an inexpensive continuous rotation servo motor was selected to power the mechanisms. This servo rotates fully forward or backwards instead of moving to a position and was readily available online. To minimize the weight and cost, we decided to use a single servo to actuate the pair of wings instead of using one servo for each wing. This presented the challenge of how to transfer the rotation from the motor to the second wing of the mechanism. A driver gear, with matching spline, was designed to be installed on the output spline of the servo. A follower gear, of equal diameter, was then be paired with the driver gear to provide the input rotation for the second wing.
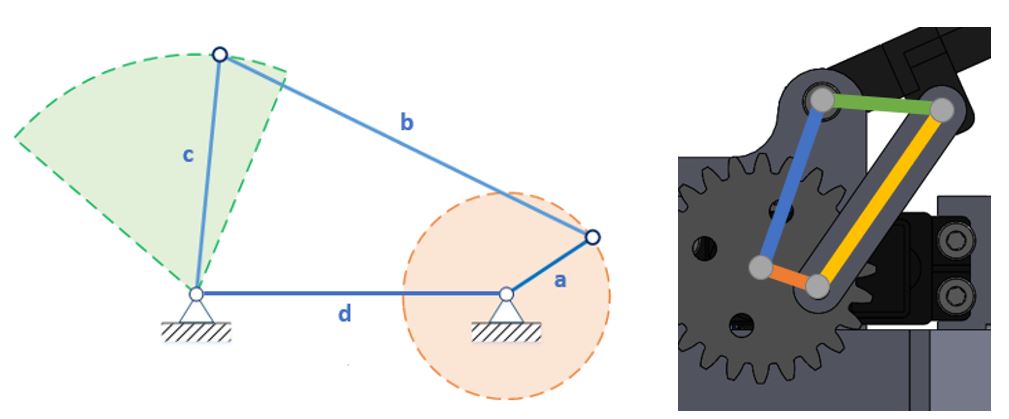
The design criteria and motor selection led to a flapping mechanism design that used a four-bar linkage with revolute or hinged joints. The configuration of a four-bar linkage is controlled by adjusting the lengths of the linkages in the system. Our four-bar linkage was configured in a crank-rocker orientation, which converts the continuous rotation of the input link, a, to a limited rotation of the output link, c.
Off-the-shelf hardware was utilized to provide the hinged joints in the system and to secure the wings and linkages to the housing.
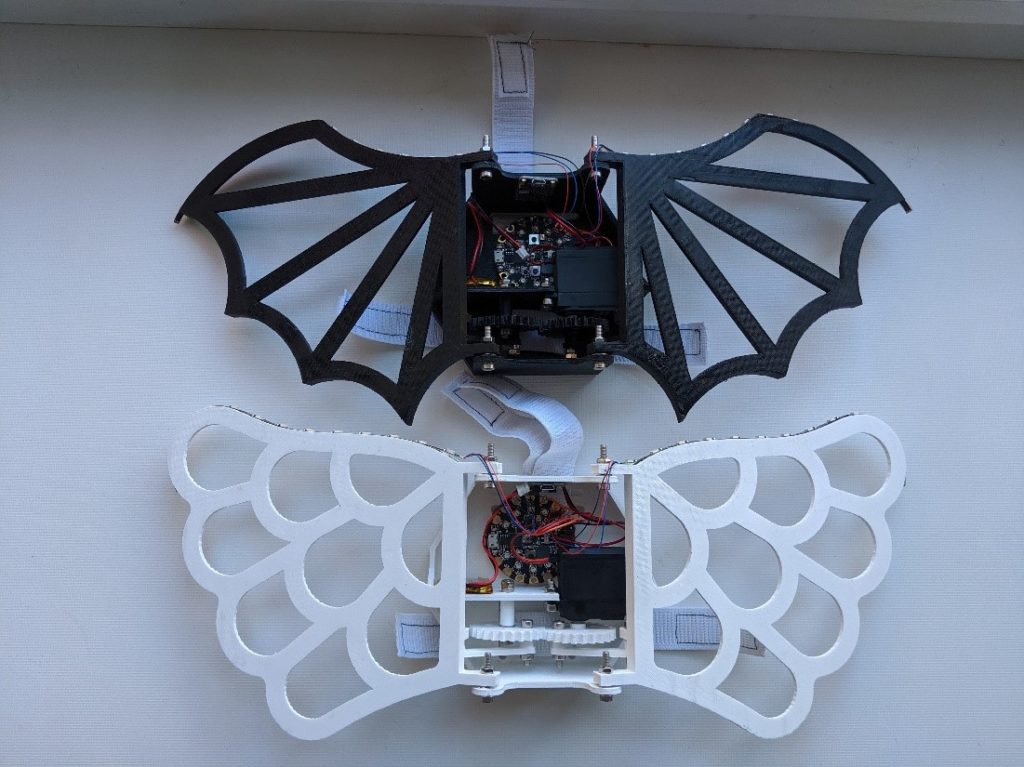
The design of the housing was the final piece that literally holds the whole system together. Not only did the housing have to provide mounting points for all the components in the flapping mechanism, but it had to protect the electronics from the mechanisms and the babies from both. The housing was segregated into two sections, one for the moving components and one for the electrical components. Channels for routing the elastic straps were added to the housing to provide a means of attaching the mechanisms to the babies. The housing, wings, linkages, and gears were 3d printed and the components were assembled with off-the-shelf hardware.
Electrical Engineering
The electrical engineering effort was relatively low as there are so many excellent kits available from online vendors such as Adafruit and Sparkfun. The quick timeline for the project meant this was a necessity as there would be no time to spin custom PCBs.
The Circuit Playground Express was selected for the microcontroller because it had a wide variety of sensors and peripherals we could play with (an accelerometer, a microphone and speaker and a ring of neopixels). We decided to add some bling and implement a strip of neopixels along the top of each wing as well. These strips can be cut-to-length and are controlled with a one-wire serial protocol which allows you to daisy-chain them and avoid bulky wiring harnesses.
The system was powered by a lithium ion battery which was oversized so as to not have to worry too much about the battery life or maximum current draw. A very quick worst-case calculation of the LED power draw if 100% of the LEDs were driven determined the maximum current draw and then we assumed the lithium ion could comfortably supply 2x the nominal capacity. We also added a small lithium-ion charger breakout so that we could charge the system in-situ instead of having to remove the battery each time.
Firmware Engineering
Firmware development began with choosing which language to use for the Circuit Playground Express board. We chose to use CircuitPython on the Circuit Playground Express to speed up development time because we could utilize existing libraries for the neopixel strips and simple motor control.
Motor Control
The key feature of the firmware was the reactive motor control. Particular position of the wings was not important to the design nor to the baby. However, speed was very important to the baby. A relatively sedate pace was chosen for the minimum and the maximum speeds so as not to alarm the babies. At higher speeds the wing housing flapped against the baby’s back causing the baby to become confused with a very concerned look to come across the baby’s face.
Each iteration of the control loop calculated the change in acceleration on each axis of the accelerometer. These changes were added up to determine how vigorous the baby movements were. If an increase in baby movement was detected the speed of the motor was increased by a small increment until capped at a maximum speed. This produced a steady increase in the speed of the flapping without sudden jolts of movement. Conversely, when the baby stilled the wings slowly decreased speed to the minimum speed. Early incarnations of the code had the change in acceleration more directly setting the speed of the motor, this produced quick jerks of movement by the motor and was upsetting to the baby.
LED Control
There are two types of LEDs being controlled on each device: neopixel “wheel” LEDs on the board itself, and neopixel strips attached to the wings. Each of these LED sets had a different control mechanism to add their own unique flair to the look-and-feel of the devices. The neopixel wheel on the Playground Express board is controlled purely by the accelerometer data. Absolute values of X data from the accelerometer was set to the red LED value for all wheel neopixels, green value corresponded to the Y data, and blue to Z data. One could tell by a quick change in lights whether a baby had toppled over, if not already obvious by other visual and auditory clues.
Adding the neopixel strips to the tops of the wings was a fun addition to increase the glamour of the wing assemblies. The twinkling of the neopixel strips were also partially controlled by the baby’s movement. The percentage of the LEDs lit at any given time was proportional to the speed of the motor. When the motor was at the max speed the LEDs were all lit. At the lowest motor speed 3% of the neopixels were lit, producing a pleasing twinkling effect. The color of the LEDs were pseudo randomly generated within particular ranges. The Angel had random values between 20 – 100% saturation for the red and green LEDs and 0 – 100% for blue to twinkle bright light values of all colors. The Devil had random values between 20 – 100% for red, 0 – 20% blue and 0 green to produce devilish red to purple twinkles.
The competition was certainly exciting and a great way for all of the participating Simplexity engineers to show off their amazing mechatronics skills. If you missed the excitement, check out all the videos submitted by the participating teams!
Ultimately, the winged babies came in very, very close to the frontrunner, Spidermech! But the Hell’s Angels look forward to the competition (and your vote!)


